/_posts/2011-02-11-backbone.js-makes-building-javascript-applications-fun.md
Markdown | 355 lines | 276 code | 79 blank | 0 comment | 0 complexity | ac205978f225eebf9e4241712be0cc8a MD5 | raw file
- ---
- layout: post
- title: Backbone.js Makes Building JavaScript Applications Fun
- ---
- Like many developers I've had a long, complicated relationship with Javascript.
- Especially with libraries like [jquery](http://jquery.com) it's incredibly easy to add interesting behavior to your pages, but unless you're very careful
- its also likely that you'll end up with a mess of spaghetti javascript. I know as I've gotten myself into that mess and abandoned many projects
- because they were just too hard to change.
- All this has changed with some of new libraries out there that help you write your javascript following the MVC pattern.
- Today I'm going to talk about [backbone.js](http://documentcloud.github.com/backbone/)
- and show how it helped me and two friends build a rich one-page application to understand an exception stack trace.
- Backbone.js describes itself as supplying structure to JavaScript-heavy
- applications by providing models with key-value binding and custom events, collections with a rich API of enumerable
- functions, views with declarative event handling, and connects it all to your existing application over a RESTful JSON
- interface.
-
- There are a number of [tutorials](http://liquidmedia.ca/blog/2011/01/backbone-js-part-1/) and
- [examples](http://documentcloud.github.com/backbone/#examples) available out there to get you started.
- The basic idea is to uses backbone.js to organize your code into models, views and controllers.
- ## What is CodeBuddy
- [CodeBuddy](http://rubygems.org/gems/code_buddy) is the application I'll describe.
- It helps you navigate an exception stack raised by your Rails app or any other stack you paste in.
- I worked on it with [Pat Shaughnessy](http://patshaughnessy.net) and [Daniel Higginbotham](http://www.flyingmachinestudios.com/)
- and Pat produced a super article describing
- [what CodeBuddy is and how to use it](http://patshaughnessy.net/2010/12/13/codebuddy-see-your-ruby-stack-come-alive).
- There is some server-side code that replaces the Rails Show Exceptions page and syntax highlights a snippet of source code for each line in the stack but
- for this article I'm going to ignore that and focus on the interactive page and the javascript behind it.
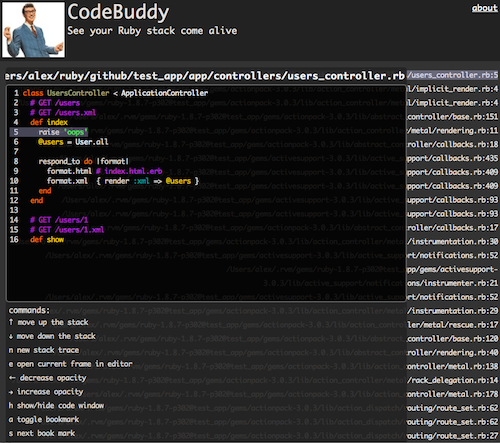
- Below is a picture showing a stack trace the background and the code snippet for the currently selected line in front.
- Now a picture is okay but to really get a sense of it I suggest you follow this link to
- <a href="/examples/code_buddy" target="_blank">experience Code Buddy in action</a>
- - try pressing ↑ or ↓ or double clicking a few lines in the stack then press `s`.
- 
- There's a lot going on here and if we had tried building this before discovering backbone.js we probably would have had created a mess -
- mixing javascript and html that quickly would have become hard to change.
- I'm going to show you how backbone let us separate the models from the views and create something that was not hard to grow.
- Let's get into the technical details!
- ## Organizing our data in Backbone Models
- We want to follow good OO design principles and thinking about this our exception stack is really just a few objects:
- * A `Stack`
- * has many `Addresses`
- * knows which `Address` is selected
- * Each `Address` has
- * path to a file
- * line number
- * snippet of code
- We can build this as a JSON object like
- {% highlight javascript %}
- var stackJson = {
- "stack_frames": [
- { "path": "/Users/alex/ruby/github/test_app/app/controllers/users_controller.rb",
- "line": 5,
- "code": "class UsersController < ApplicationController\n..."
- },
- { "path": "/Users/alex/.rvm/.../lib/action_controller/metal/implicit_render.rb",
- "line": 4,
- "code": "module ActionController\n..."
- }
- ],
- "selected": 0
- }
- {% endhighlight %}
- The first step is to turn this into backbone models.
- {% highlight javascript %}
- // Stack, Address and Addresses
- CodeBuddy.backbone.Stack = Backbone.Model.extend({
- initialize: function() {
- this.set({
- addresses: new CodeBuddy.backbone.Addresses(this.get('stack_frames'))
- })
- }
- })
- CodeBuddy.backbone.Address = Backbone.Model.extend({
- })
- CodeBuddy.backbone.Addresses = Backbone.Collection.extend({
- model:CodeBuddy.backbone.Address
- })
- {% endhighlight %}
- The way we build a model in backbone is by extending `Backbone.Model`. When extending we can add custom behavior
- if we want. In our example we tell the `Stack` to contain a collection of `Address` objects in the `Addresses` collection.
- We use the backbone collection framework to define `Addresses` and tell it that it is a collection of `Address` model objects.
- These models will use the default backbone behavior for the rest which includes read/write access to its properties `get` or `set`.
- Now that they're defined, we're ready to interact with these models. For example below is what you'd see using the Chrome javascript console
- (I'm showing the output as comments for readability)
- {% highlight javascript %}
- // Using our models in a console
- CodeBuddy.stack = new CodeBuddy.backbone.Stack({
- "stack_frames": [
- { "path": "/Users/alex/ruby/github/test_app/app/controllers/users_controller.rb",
- "line": 5,
- "code": "class UsersController < ApplicationController\n..."
- },
- { "path": "/Users/alex/.rvm/.../lib/action_controller/metal/implicit_render.rb",
- "line": 4,
- "code": "module ActionController\n..."
- }
- ],
- "selected": 0
- })
- // inherits.child
- CodeBuddy.stack.get('addresses')
- // inherits.child
- CodeBuddy.stack.get('addresses').first().get('path')
- // "/Users/alex/ruby/github/test_app/app/controllers/users_controller.rb"
- CodeBuddy.stack.get('addresses').first().get('code')
- // "class UsersController < ApplicationController
- // ..."
- {% endhighlight %}
- We now have an object hierarchy with default behavior which we can (and will) extend in a bit but first let's build some views and get a page we can look at.
- ## Building the UI with Backbone Views
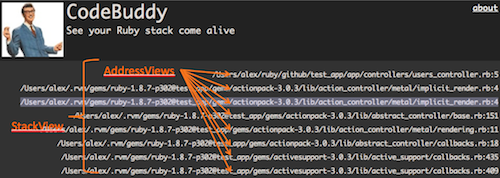
- We're going to build
- * A `StackView` that contains many `AddressViews`
- * Each `AddressView` will display a single line from the stack.
- * Each view will be tied to one of our model objects
- It will look something like this:
- 
- We can start with a `StackView` that's tied to the `Stack` model.
- Creating a backbone view is very similar to how we created our models - we extend `Backbone.View` and can
- override behavior if we want.
- {% highlight javascript %}
- CodeBuddy.backbone.StackView = Backbone.View.extend({
- el: $("#stack"),
- initialize: function() {
- this.model.get('addresses').each(this.addOneAddress);
- },
-
- addOneAddress: function(address, index) {
- var view = new CodeBuddy.backbone.AddressView({model: address});
- this.$("#stack").append(view.render().el);
- }
- })
- {% endhighlight %}
- In this case we overrode the `initializer` function to create an `AddressView` for each address.
- It also uses jQuery to add the `AddressView's` html within the page's `#stack` element.
- To do the iteration we use another powerful javascript library called
- [underscore.js](http://documentcloud.github.com/underscore/). Underscore.js gives us a ruby-like collection methods letting us
- write `.each(this.addOneAddress)`. This will iterate over all the `addressses` calling the `addOneAddress` function on each one.
- Underscore.js also gives us erb-like templating we'll use in the `AddressView`...let's take a look at that view.
- {% highlight javascript %}
- CodeBuddy.backbone.AddressView = Backbone.View.extend({
- tagName: "li",
- template: _.template("<span class='container'><%= path %>:<%= line%></span>"),
- initialize: function() {
- },
- render: function() {
- var html = this.template(this.model.toJSON())
- $(this.el).html(html);
- return this;
- }
- })
- {% endhighlight %}
- You can see the template and how it does look like erb. It defines the html that will be displayed for each address and its able to access
- properties in the model like `path` and `line`. The template gets applied in the `render` function with the line `this.template(this.model.toJSON())`.
- Finally, `tagName` is used to wrap this html in an `li` tag.
- Now we can put it all together to see on a page. We can start with a toplevel page that has an element with `stack`, includes our models and views and tells them to load.
- {% highlight html %}
- <html>
- <body>
- <ul id="stack"></ul>
- <script src="javascripts/code_buddy.js" type="text/javascript"></script>
- <script>
- CodeBuddy.setup({
- "stack_frames": [
- { "path": "/Users/alex/ruby/github/test_app/app/controllers/users_controller.rb",
- "line": 5,
- "code": "class UsersController < ApplicationController\n..."
- },
- { "path": "/Users/alex/.rvm/.../lib/action_controller/metal/implicit_render.rb",
- "line": 4,
- "code": "module ActionController\n..."
- }
- ],
- "selected": 0
- })
- </script>
- </body>
- </html>
- {% endhighlight %}
- After the page loads and the views render it changes the `#stack` div to have all this
- {% highlight html %}
- <ul id="stack">
- <li>
- <span class="container">/Users/alex/ruby/github/test_app/app/controllers/users_controller.rb:5</span>
- </li>
- <li>
- <span class="container">/Users/alex/.rvm/.../lib/action_controller/metal/implicit_render.rb:4</span>
- </li>
- </ul>
- {% endhighlight %}
- So far this is a lot of framework and structure for a simple page but now is when it gets interesting and backbone reveals its true power!
- ## Showing code for the selected address
- Let's say we want to mark one address selected and show the code for that one.
- 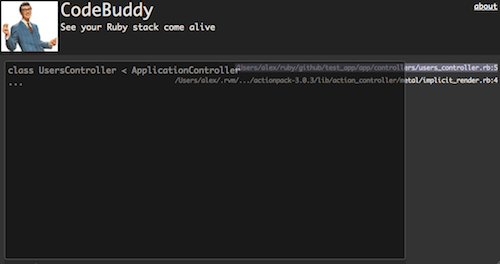
- We can start by adding an element to the html called `code-viewer`
- {% highlight html %}
- <html>
- <body>
- <ul id="stack"></ul>
- <div id="code-viewer">
- <div id="code"></div>
- </div>
- <!-- all the javascript omitted for clarity -->
- </body>
- </html>
- {% endhighlight %}
- Now we want to create a `StackView` to put the right code in there
- {% highlight javascript %}
- CodeBuddy.backbone.CodeView = Backbone.View.extend({
- el:$("#code-viewer"),
-
- initialize: function() {
- },
-
- render: function() {
- this.$("#code").html(CodeBuddy.stack.selectedAddress().get('code'))
- }
- })
- {% endhighlight %}
- In this view we used our models to find which address was selected `CodeBuddy.stack.selectedAddress()` so let's add that method.
- {% highlight javascript %}
- CodeBuddy.backbone.Stack = Backbone.Model.extend({
- initialize: function() {
- // same code as before
- },
- addresses: function() {
- return this.get('addresses')
- },
- selectedAddress: function() {
- var selected = this.get('selected')
- return this.addresses().at(selected)
- }
- })
- {% endhighlight %}
- That's it, now we have a code view on top of the stack view and our code is still clean and well organized. I'm not afraid to keep going and make our next change.
- ## Changing the selected address
- Oh, we just got a new requirement to be able to scroll up and down through the stack and see the code window change as we go.
- We add some more functions to our Stack Model so we can change the selection and we also tell it to call the `selectionChanged` function whenever
- the `selected` property changes.
- Calling a function on a property change is something that's given to us with [backbone events](http://backbonejs.org/#Events).
- Getting the view to update itself is also easy we just tell it to with `CodeBuddy.codeView.render()`
- {% highlight javascript %}
- CodeBuddy.backbone.Stack = Backbone.Model.extend({
- initialize: function() {
- this.bind('change:selected', this.selectionChanged);
- // same code as before
- },
- setSelection: function(newSelected) {
- if (newSelected >= 0 && newSelected < this.addresses().size()) {
- this.set({ selected: newSelected })
- }
- },
-
- selectPrevious: function() {
- this.setSelection(this.get('selected') - 1)
- },
-
- selectNext: function() {
- this.setSelection(this.get('selected') + 1)
- },
- selectionChanged: function(x) {
- this.addresses().at(x.previousAttributes().selected).view.render()
- this.addresses().at(x.changedAttributes().selected).view.render()
- CodeBuddy.codeView.render()
- },
-
- // all the existing functions remain
- })
- {% endhighlight %}
- The last thing we need to do is give some way for the user to change the selection.
- We decided to use [jQuery Hotkeys](http://code.google.com/p/js-hotkeys/) to bind to
- the up and down arrows (↑ or ↓).
- {% highlight javascript %}
- CodeBuddy.setStackKeyBindings = function(){
- $(document).bind('keydown', 'up', CodeBuddy.stack.selectPrevious)
- $(document).bind('keydown', 'down', CodeBuddy.stack.selectNext)
- }
- {% endhighlight %}
- ## Conclusion
- I hope this example has shown a little of the power of using backbone.js when you need to write a complex javascript application.
- If you want to see the actual application its all on Github in
- [code_buddy.js](https://github.com/patshaughnessy/code_buddy/blob/master/lib/code_buddy/public/javascripts/code_buddy.js)
- This was our first project working with backbone.js and I'm sure there's much more we can learn but we've found that it
- lets us write modular code with many small methods which feels much closer to writing Ruby than my previous forays into javascript.
- **Backbone.js makes writing a javascript application fun!**